
Several years ago, while discussing the prospects of a “real” web site for my church with the pastor, I brought up the idea of putting our backlog of recorded services online. We discussed ways to digitize the services, which used to be recorded to cassette tape, but which were now being recorded on CD. This naturally led to a question about what we wanted to do with all the old tapes we had lying around in white storage boxes, stuffed in various corners of the church. I took it upon myself to look into converting them into some sort of digital format.
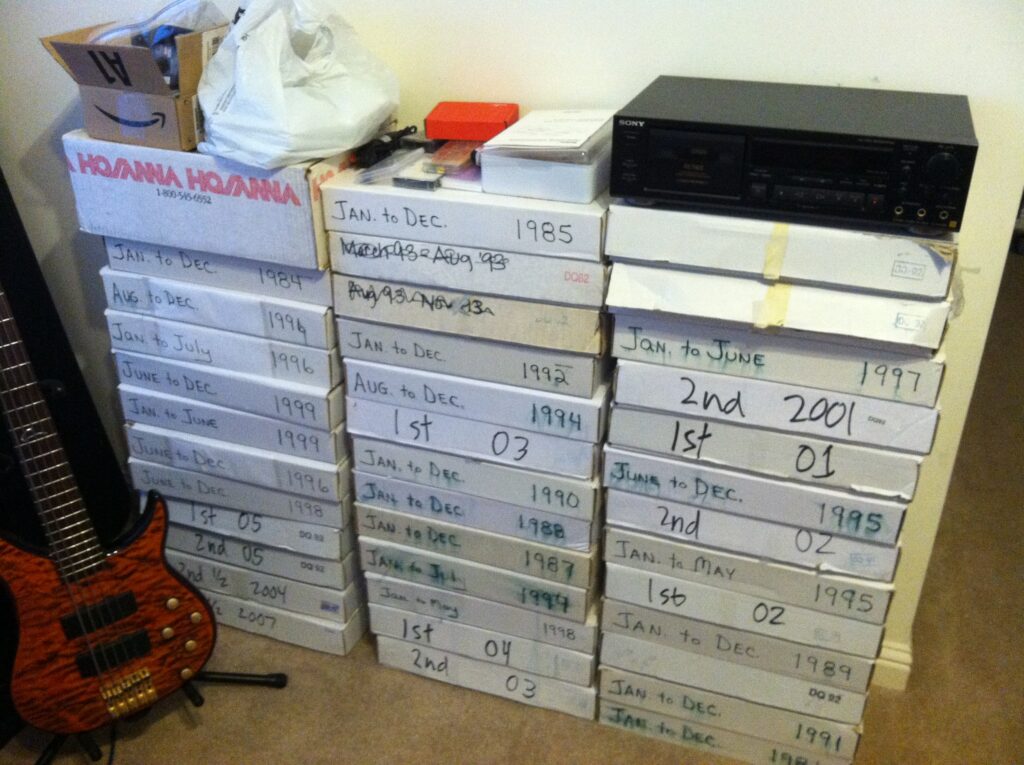
So I scoured the internet for information on how to digitize cassette tapes. There were a couple services that would convert them to CD’s and/or MP3’s, charging $5 to $10 per tape. Well, with something close to 2,000 tapes to convert, this was… prohibitive for our church.
Another option I found was from a now-defunct company who once made equipment for doing exactly this sort of thing. However, it was quite expensive. Even the used gear I could find on Ebay now was running between $5,000 to $10,000. Interestingly, it consisted of a card that you put into your computer, a machine for running the tapes, and a big cable to run between the two. Note this. We’ll come back to it later.
The last option was the most obvious, but the least practical: run the tapes, by hand, in real time, from a standard tape deck, into the computer, and convert them manually. Again, with so many tapes involved, we’re talking about many thousands of hours of time. Even if they just run without interaction for a large part of the process, and then get switched in between, the hassle would be enormous.
It was clear to me that the church had neither the time nor the money to convert the tapes. I filed the situation in the back of my brain, and moved on to other matters.
A couple years later, I took a job with a new company. One that, at its core, did advanced data acquisition and analysis. A big reason that the company has succeeded in this field is because there are a lot of really talented people there. One day, out of nowhere, two and two came together to make four, and I realized that all the bits and pieces of the cassette-tape-digitization problem were lying around me in plain sight.
Aha!
At my church, we had always had a high-speed tape duplicator to make copies of the tapes for people wanted a copy of the service. I got the idea that I could tap into the duplicator and intercept the recording head’s signals on their way to the copy, and feed them into a sound card in a computer. Then I could slow down the recording, and then convert it to an MP3.
I opened up the duplicator and started studying the electronics. This only got me so far, so I ordered a service manual for the unit, with complete schematics. I made some test probes with a voltmeter, but nothing was very clear, as my $15-Radio-Shack special wasn’t giving me a lot of info. So I finally admitted a certain amount of defeat, and asked the owner of the company I was working for — who was an expert at electronics design — to look at the schematics. He immediately started recognizing the various sub-circuits, and explained to me what was going on with the signals as they passed through the various stages of processing. He drilled down to where he thought I should take the signals.
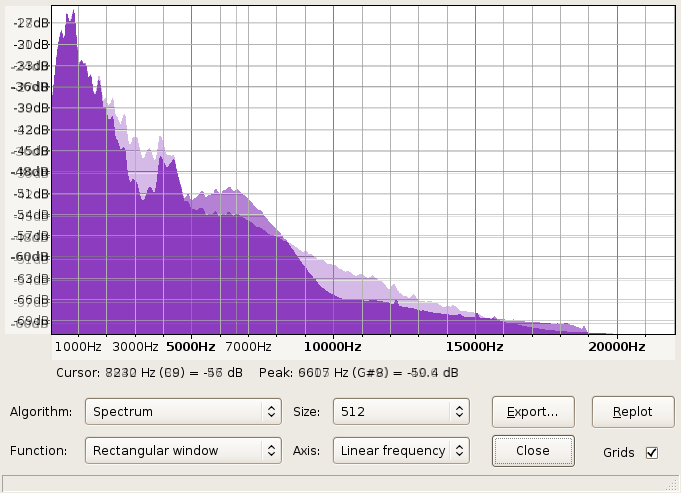
I cut off the phono ends of an audio converter cable, and soldered them into locations on the circuit boards in the duplicator where I was told, then plugged the DIN plug into my computer’s sound card. I recorded what was coming from the duplicator, fed it into a really cool audio editing program on Linux, and slowed the recording down. It was a disaster. I had a strong, persistent noise that I couldn’t get rid of, and everything sounded muffled. I immediately recognized my stupidity.
The duplicator was running at 16x normal speed, and even though I could “stretch” the recording out by “slowing it down” by 16 times, the circuit to transduce the signal can’t “hear” audio frequencies above normal hearing. By playing the audio at 16x speed, all the frequencies were being multiplied by 16, and the only thing my audio card could capture was (22,000 Hz / 16 =) 1,375 Hz and below, which sounds very muffled.
Hardware
If I was going to do this, I needed a real digital acquisition card. I studied National Instruments’ product lineup for hours and hours, and finally decided on one card that would work for my purposes… if I allowed a couple corners to be cut. The problem was that the card sold for $2,700! I guess that’s fine if you’re a big company doing things that will make a lot of money, but I was just a hobbyist trying to do something for fun. What’s worse is that the no-compromise card for this project retailed for $4,000! Fortunately, I found a card like I needed for about $130 on Ebay.
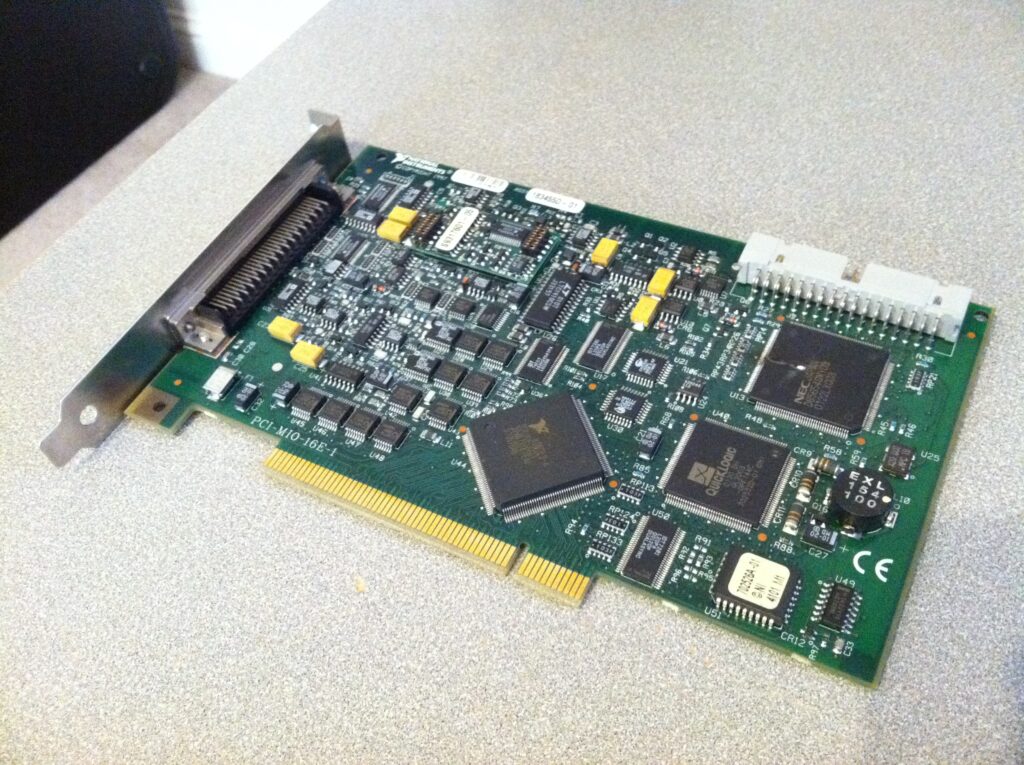
I bought one, along with a breakout board and cable. With that, I realized that I was effectively in the process of making the same sort of equipment that I had seen on Ebay for thousands of dollars, which I mentioned above. So I grabbed the duplicator and all the old tapes from the church, to keep them safe from being thrown out, and I started to work on the idea.
Software
From a engineer’s point of view, National Instruments is a really interesting company. They make some really neat hardware that does really powerful stuff, and they make really cool software to run it too. Although their LabView software is really expensive (and, again, amazingly cool), they support all of their cards on Linux with their C-based driver library, and they have extensive examples and an abundant help forum. There were a few twists and turns, but I finally got the program written to capture the audio. It acquires the data, and produces two WAV files: one for each side of the mono tape.
After taking the signals comes the post-processing. At a minimum, the second side of the tape has to be reversed and appended onto the first side. However, while I’m doing this, I go ahead and chop off silence at the ends of the both sides to get rid of the dead space due to the tape leaders, normalize the volume, and resample to a standard bitrate. (I even developed a “multiband compander” to try to remove most of the Dolby noise reduction effect that our recording deck put on the tapes, but I didn’t use it “in production” because some tapes have it, and some don’t, and there’s no way to tell.) For all of these functions, I use a wonderful open-source tool: SoX, “the Swiss Army knife of sound processing tools.”
Everything Needs a Webapp
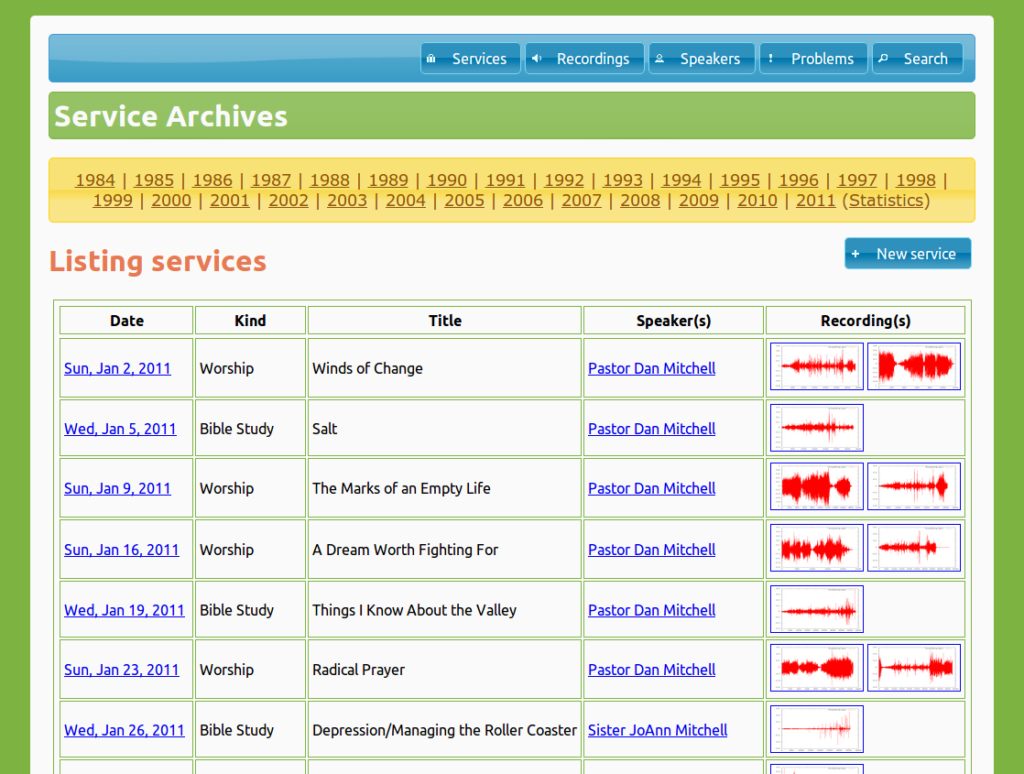
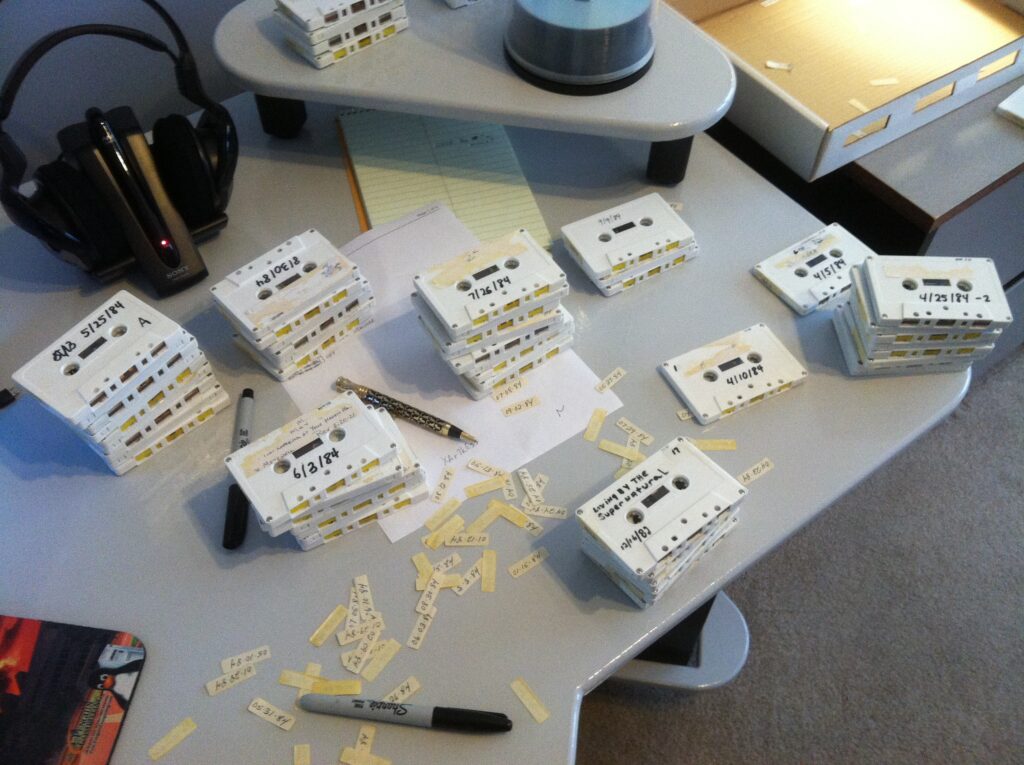
After getting this far, of course I needed a webapp to manage the metadata for the tapes. The church had paper records of the oldest recordings, probably for half of them. There were Word docs for the rest. I scanned and OCR’ed the paper, and merged that info with the Word docs into a big spreadsheet. Then I manipulated the data until is was “clean enough,” and stuffed it into a database, where I did some more cleanup. Then I finally put a Rails frontend on it, and the cleanup continued.
As an aside, I needed to install everything by hand on CentOS to get Rails running. I needed to download and install Ruby, rubygems, the Rails gems, and the mysql gem. It was a lot less scary than I thought it would be, and makes me think I should be using RVM in general. Anyway, for my own reference, and yours, I also needed to follow this advice, and install the “ncurses-devel” package to get the gems compiled.
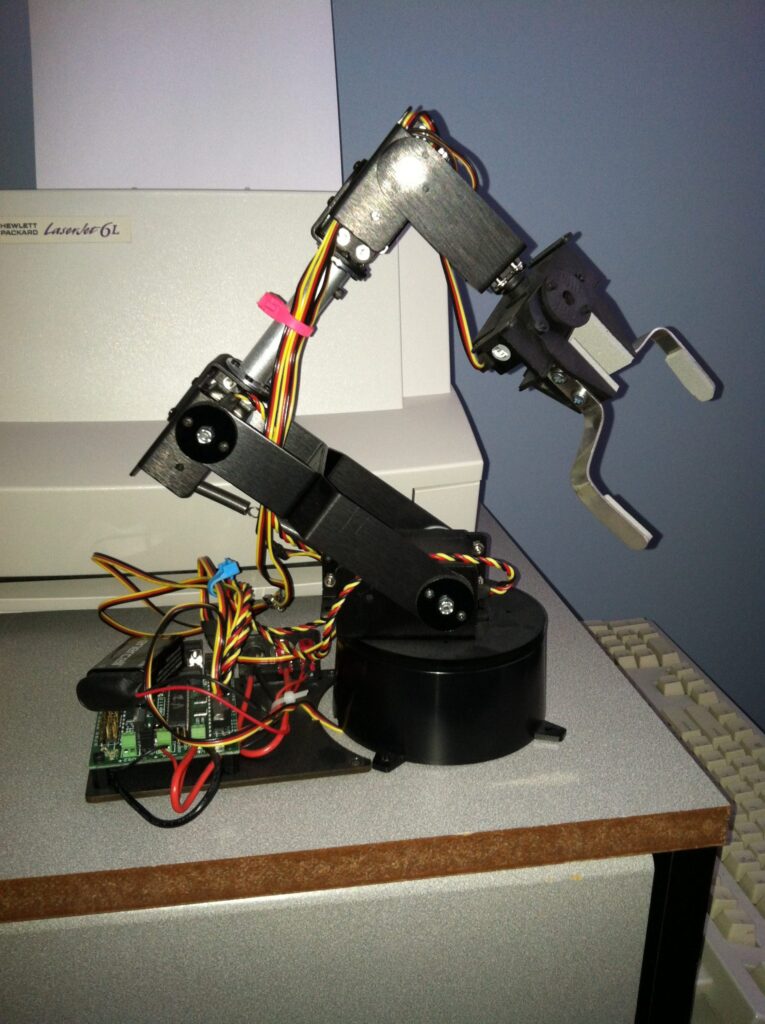
At this point, all that was left was to run the tapes by hand, changing them every 6 minutes, and running several programs in sequence. To try to automate the process, I needed to get control of the duplicator by the computer. I wired into the start switch relay, and the run-and-rewind logic circuits on the duplicator’s board. The DAQ couldn’t generate enough current to trip the duplicator’s relay, so I had to buy a 5v solid state relay from Radio Shack.
However, the DAQ didn’t have enough juice for it, either, so I tried building an op-amp based voltage follower. This wasn’t the best option, but it was all I had been taught in school. Unfortunately, while trying to get it going, I crossed some wires checking voltages with my multimeter, and fried my DAQ! (If you look closely at the picture above, you can see a big hole blown in the side of the top right chip.) It also taught me about the usefulness of zener diodes…
So I bought another DAQ on Ebay again, took some advice from my boss — who had a masters in EE — and built a transistor-based current amplifier. I run that with a USB-based power supply I put together from a kit from SparkFun. I felt like I was back in the 70’s, building a radio from parts ordered from the back of pulp comic books.

As a second pass at automating this process, I wrote a script to run a batch of tapes. I can put a list of tape dates in a text file to convert. The script looks up the date, finds the service, generates a full name for the recording file, runs the digitizing program, calls the post-processing, and then checks the completed files (compressed and uncompressed) into the webapp.
As a last step to fully automating this process, I looked into using some sort of robotic tape changer. I bought three Armatron robot toys thinking I could use them to move tapes around. However, I destroyed two of them in the process of figuring out that they just wouldn’t work for my application, and I gave the other one away.
Next, I got out my old trunk of Lego. I had a few Technics sets back in the day, and I thought I would be able to make some sort of robotic tray out of them. I was inspired by this Eli Carter‘s floppy-disk archiving robot. However, it’s clear that I don’t have enough parts to make a real attempt at doing this, and I don’t want to spend the money on a Mindstorms set.
I eventually pulled the trigger on a “real” robot arm. I put it together, and could drive it with some outputs on the DAQ. I made a tape “magazine” with LEGO, to try to pull from the bottom of a stack, and then insert it into the tape duplicator. However, the little catch-the-top-edge-and-push-the-bottom-into-place the duplicator’s slot requires was just too much for either me to manage with the DOF at my disposal, and the grip strength of the “hand.” Ultimately, I sold the thing on Ebay.
What I finally, finally did was ask a lady at our church — who absolutely LOVED preaching tapes from all over our organization — and who was home-bound for medical reasons — to load the tapes, and hit the button. I setup the rig at her apartment, and, over the course of a couple of months, I carted in new tapes, and lugged out the processed ones. Like a soldier, she ran them all.
I’ve finally thrown out the machine and the computer. I kept the DAQ for the sake of nostalgia, but the rest is gone. For historical purposes, I’ve put the digitization code on GitHub. The file digitize4.c contains the last, most-feature-complete version, and is an approachable example on how to write a low-level signal acquisition program with National Instruments equipment, using 4 types of I/O at once (if I do say so myself).