
History
I started out my computer ownership with a solid wood library table, which my father-in-law gave me. It was sturdy, and well made. I miss it sometimes.

At work, though, I had a cubicle with a corner unit, and I wanted the same sort of thing at home. So I broke down and bought one that had a 45-degree angle.

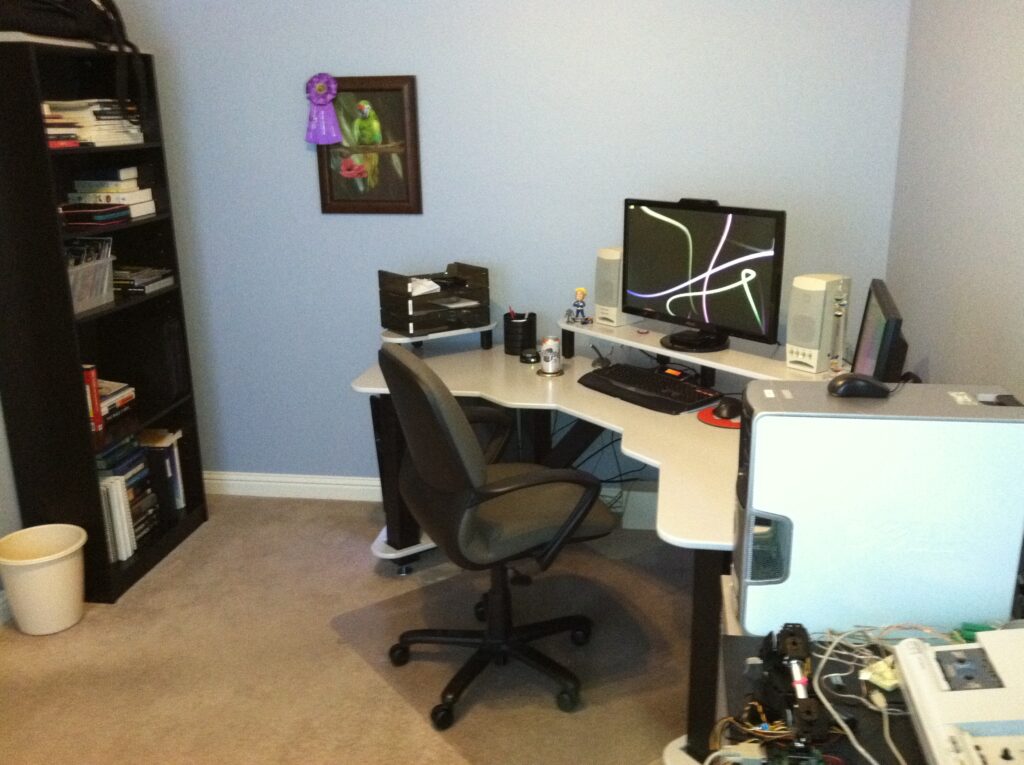
I had that desk for something like a dozen years. Note the limited space for a monitor. When I got it, I had a 17″ CRT.
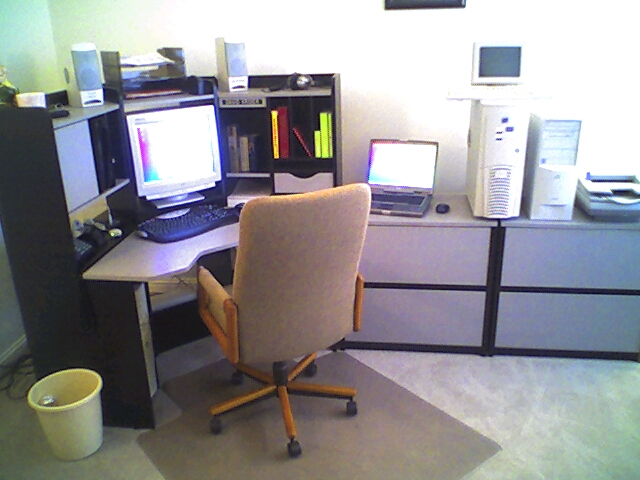
I upgraded to a 19″ CRT, and, as you can see, it just barely fit. There was roughly a 1/4″ of wiggle room between the monitor and the sides of the desk. I had wanted a larger monitor for a long time, but there was no room to expand.
The Idea
For years, I looked for the perfect computer desk. While I’d love to just buy a Steelcase or an Anthro, I’d have to take a second mortgage to afford one. So, besides being affordable, I’ve had just a few criteria:
- First, it must be at least 30″ deep. I want to be able to set some papers on it. I hate shallow desks.
- Second, it needs to be a corner arrangement. I don’t like the keyboard in a tray, and a corner-type desk allows me to put it on the desk, and rest my elbows naturally.
- Third, there needs to be nothing in the way of my legs. Most cheap computer desks fail on this last point, including the one above.
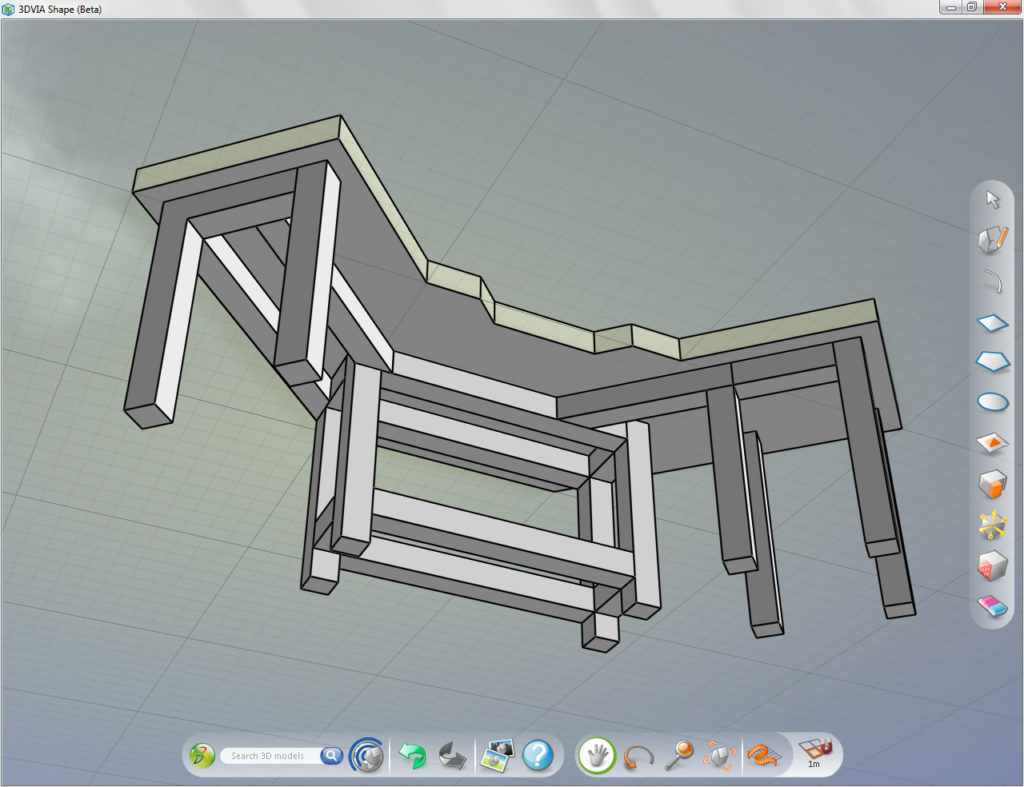
Because I couldn’t find anything like what I wanted, I started designing my own. I tried using Google’s free version of SketchUp, but found it very difficult to use because I couldn’t dimension anything. I also tried 3DVIA from Dassault. At least it got me to see that I was hopelessly over-engineered. I moved on to using QCad under Linux, but after about the 4th time it crashed on me, I became annoyed enough to try Alibre under Windows. I have to confess: that is awesome software. For only $100, you can do some serious damage. (On the other hand, I tried to use it’s assembly features, and got hopelessly lost.) I finally settled on Dassault’s new, free AutoCAD clone, DraftSight. They even had a Linux version!
I determined very early in the process how I wanted to make the top. I thought I had a really cool idea, and I’ve kept that as the center of the design. I wanted to use a single sheet of 4’x8’x1″ MDF, and use the whole thing. I intended to laminate it and edge it with t-molding, like a professional desk. As opposed to the top, I’ve waffled through many different ideas on how to make the legs and stands. Initially, I wanted to make the support structure out of aluminum T-slot. I thought it would be awesome to be able to attach some stands and move them around later. The problem is that this stuff is expensive. Like, it was going to cost $600 for what I wanted. I scrapped my initial design and started again, looking to save money, but I was still in the $200 range for materials, and you have to figure about that much again for fasteners. I knew I didn’t want to spend that kind of money.
A good friend of mine is a top-flight mechanic, and can build anything. He kept trying to get me to build the frame out of steel channel. It would have been cheap, and he already had some material he would have given me. I probably could have even welded it myself. However, I simply could not get around the fact that the frame would probably have weighed 300 pounds if I had gone that route.
In the process of researching this mess, I came across the Ikea Jerker. Unfortunately, they are no longer being made, or my search would have probably been over. However, I notice that Ikea now sells the Broder line of shelving using the same sort of slotted aluminum framing. I toyed with the idea of hacking up some of these parts and making a frame with this stuff, but I couldn’t get the price below just doing it out of t-slot, so I gave up on that idea as well.
I let the project fallow.
The Final Straw
At work, I used a 25″ monitor for a time, and found I liked it better than using 2 19-inchers. So I determined to finally go ahead and buy a larger monitor. I got a 23″, thinking that I could just barely squeeze it into my desk. I did, and it sucked. The configuration didn’t work at all. Also, I discovered that, if I was going to be spending the money, I wanted even more screen real estate. The one thing that didwork out, though, is that I proved that I could reasonably run games like Fallout 3 in HD, which I had feared would not be possible with my rig. At that point, I really wanted a big monitor, but now I had to get a new desk.
I’ve been intrigued with Reddit’s /r/battlestations group, where people show off their man caves / nerd lairs. Mostly, it’s a place to brag about high-end kit, but, in the process, people wind up showing off interesting desk configurations and impressive A/V setups. Because of a post I saw there once, I became pretty serious about buying a Bestar 69430-86 Hampton Corner Workstation. However, I couldn’t find one for less than about $350, shipped. I decided that I didn’t want to spend that much money either, so I took yet another stab at finishing the design of my desk.
Design and Plans
I just finally gave up and determined I would build the frame out of lumber. I also abandoned both of the ideas of using 1″ MDF, as 3/4″ is much more common, and laminating the top. I decided to just route the edges and paint it. While it was a serious step backward in looks, these 2 decisions brought the price down from upwards of $700 to less than $100. I finally got to work.
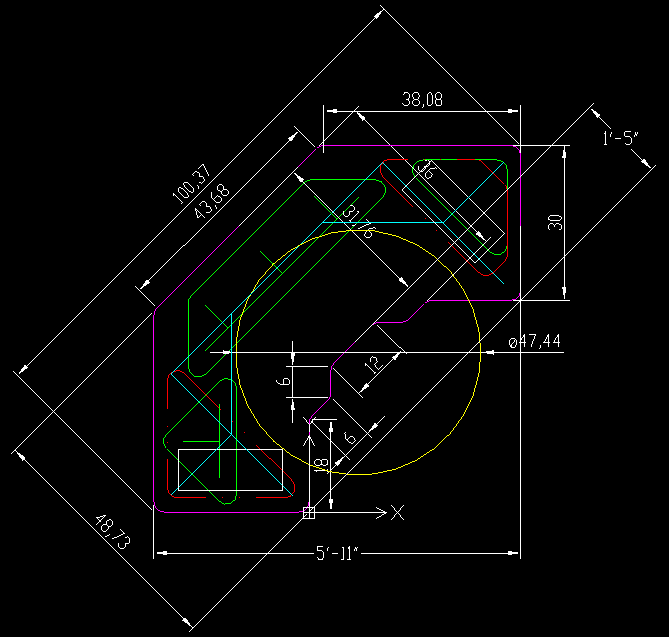
I cleaned up my 2D sketch, and you can have it. It’s not perfect. I should have shown the 4×4 posts in real dimensions. But it’s a place to start. The yellow circle is the reach of my legs. The idea here is to have an inset for the keyboard. It’s 12″ wide. Then there are 2 6″ segments. Then there’s an 18″ wing. The rest of the dimensions just fall out of this. The scrap from the inset becomes the main monitor stand. The larger corner triangles become shelves below. The smaller triangles become secondary stands.
At work, I had a buddy whip up a visualization in SolidEdge. The guy is a real pro. He had the thing donein 20 minutes, including the render, and determining the center of gravity. I was worried it might be too far back, but it was located about dead center in the middle of the desk. Turns out my engineering intuition is better than a computer.

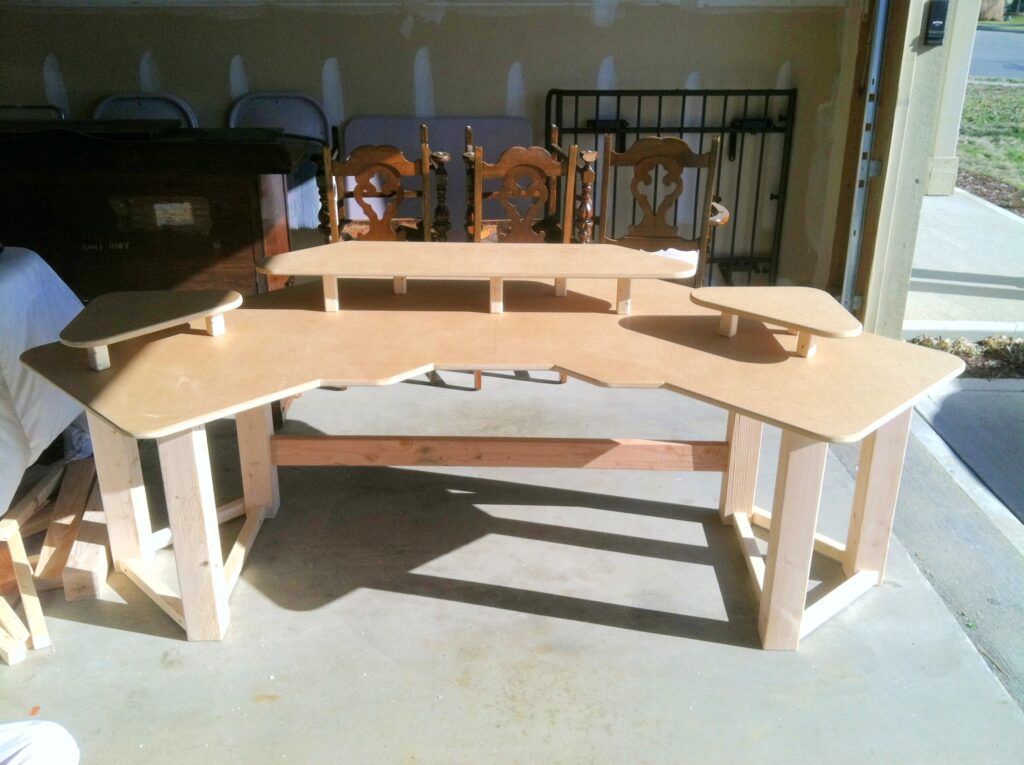
Construction
I had spent quite a bit of time thinking about the shelves below the desk, and how to support them. I finally settled on making a triangle of support. Unfortunately, I also got talked into doing it with 4×4’s. What I didn’t realize until I had finally cut out the shelves, and then placed them by the supports, is that the width of the supports severely cut into the shelfs’ area. So I decided to put the posts through the shelves.

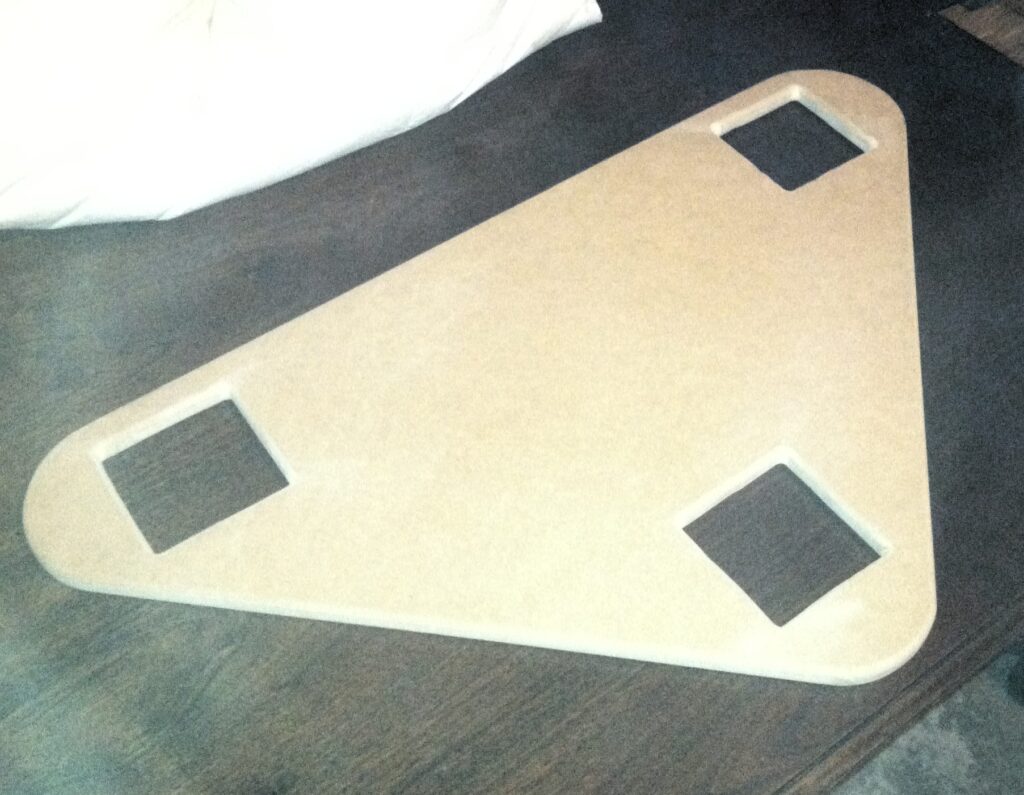
I need to hack my iPhone’s case so that it doesn’t scatter the flash, and wash out the images. Also, I did a horrible job cutting out the holes on the shelves. I partially mitigated the disaster by using some wood filler in the corners. Next time I try something like this, I’ll make a proper jig, and do the hole-drilling (to start the jigsaw cuts) precisely in the corners.
When I sat down in front of it, at this point, I realized that the lower crossbar was in the way of my shins. I decided to lay it horizontally at the same height as the shelf supports. I thought it would be a good place to put my feet.
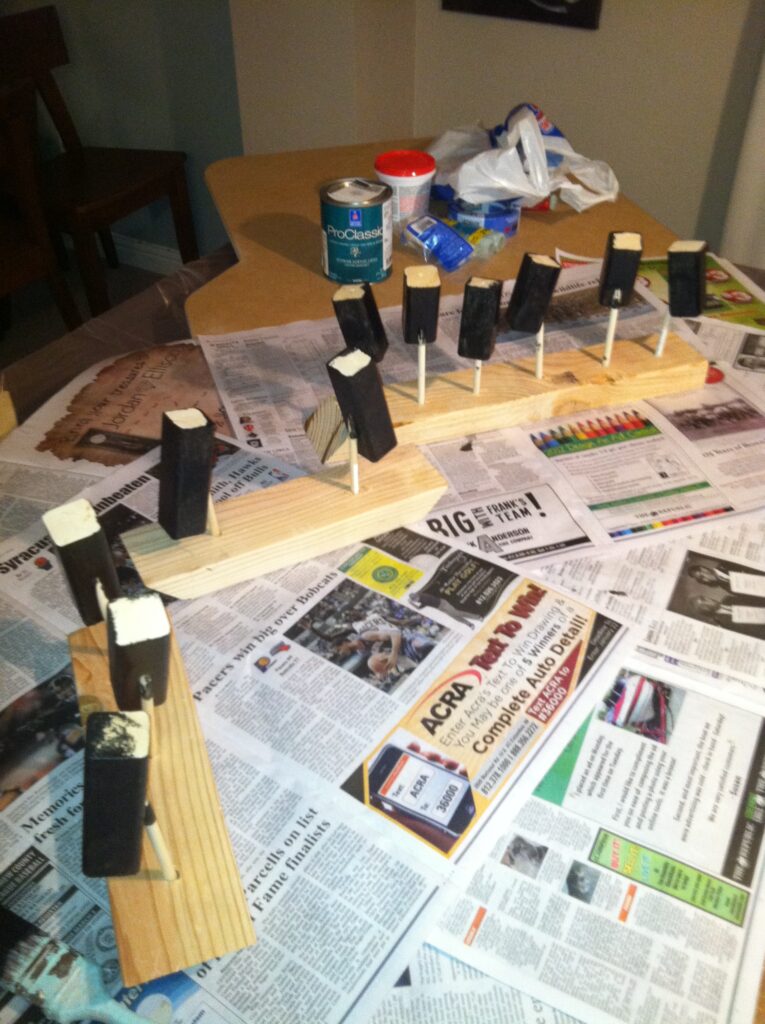
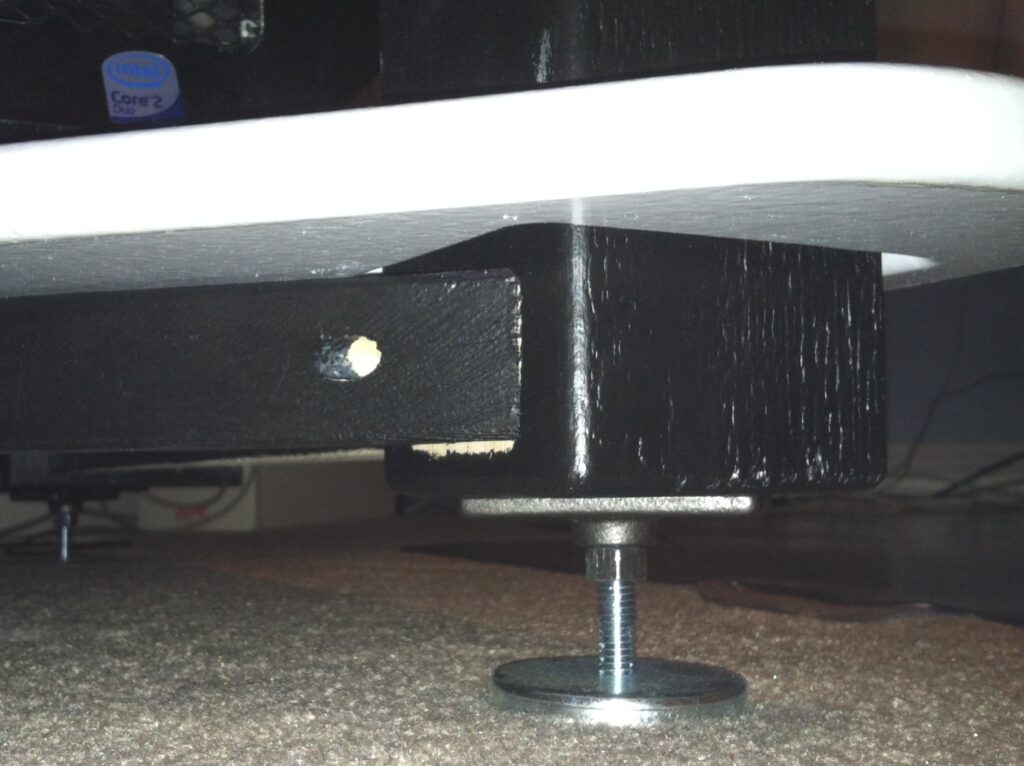
The legs are 25 7/8″ long. I drilled 3/4″ holes into the bottoms, 2″ deep. Then I put threaded rod brackets across the holes, and put threaded leveling feet into the rod brackets. I also put a 3/8″-16 nut on the feet rods so that I could give it a cinch and lock the each foot into place. I wish I had taken a picture of that step in the garage. Here’s the best I’m going to do now. Note that I have the brakets set at an angle. I found that, if I tried to do it straight, I ran into the screws holding the cross-support boards. With the extra length on the feet, it brings the desk to a height of 28 3/4″, but I have at least an inch of adjustment either way. I may lower it a quarter inch. It’d be a hassle to do it in place, but not impossible, and that’s all I was going for.
After I got everything setup and started using the desk, I discovered a couple things. First, the bottom cross bar was directly in my way. I thought it would be cool for when I wanted to put my feet on it, but I couldn’t really avoid NOT doing it. It grew tiring very quickly. Second, my knees can reach the top cross bar in the back. In my sketch, I could see that it might happen, and I just hoped I wouldn’t. If I stretch out, I have to be careful. It’s not that big of a deal, but if I ever build Desk 3.1… For now, I decided to take off that board, cut it in half, and then made 45-degree supports out of it. Now the desk is basically wonderful.
Also, the oil-based acrylic paint I used didn’t give the top the sort of “finished” feel I was going for. So I took a risk in buying yet another quart of paint, and gave polycrylic a try. (Almost) total success! I sanded the acrylic with 400-grit paper, and gave it 2 thick coats. The top feels pretty good now. I think it would be a good idea to sand it again, and give it another coat or two.
Time and Materials
So the parts list looks like this:
| Quantity | Item | Each | Total |
| 1 | 49″ x 97″ x 3/4″ MDF | $33.00 | |
| 2 | 4″ x 4″ x 8′ | $10.00 | $20.00 |
| 2 | 2″ x 4″ x 8′ | $2.30 | $4.60 |
| 2 | 2″ x 2″ x 8′ | $1.30 | $2.60 |
| 6 | Mounting Plate for Threaded Rod | $1.70 | $10.40 |
| 6 | High-Cap Leveling Mount | $2.25 | $13.50 |
| 2 | 3/8″-16 Nuts (5-count pack) | $1.00 | $2.00 |
| 1 | Plastic furniture feet pads (16-count pack) | $5.00 | |
| 1 qt. | Latex enamel paint (black) | $25.00 | |
| 1 qt. | Oil-based acrylic enamel paint (gray) | $25.00 | |
| 1 qt. | Polycrylic | $17.00 | |
| 1 | Ikea DIODER LED light kit (shipped) | $62.00 | |
| Total | $220.10 |
Without the lights (Ikea charges ridiculous shipping fees), this thing would weigh in at around $160, and about $70 of that is paint.
I knew I couldn’t reasonably drive a bunch of screws through 4×4’s, so I briefly considered connecting the lumber with various brackets. Then I figured I’d rather invest that money and get a Kreg pocket-screw joiner kit (for $100) and be able to use it on other projects. From the first experiment with it, I realized that my little battery-powered drill wasn’t going to cut it, so I also bought a plain, corded drill for $40. They’re not listed above because men don’t include the cost of tools in their projects.
I have a “beginners” mechanics tool kit and tool chest from Sears from when I worked briefly as an engine technician, where I was required to buy my own set, so I get by around the house, but I have no wood-working tools. I went to a friends’ dad’s house and borrowed a circular saw and jig saw to cut the top pieces. I borrowed a orbital sander to “fix” the jig saw cuts. I borrowed a router to bullnose all the surfaces and round off the bottoms of the desk legs and stand feet. To get time on a good miter saw, I went someone else’s house to cut the initial support structure and to someone else’s house (several times) to make final cuts. I also went to a third person’s house to cut the holes in the shelves with another jig saw, then back to his house to modify the cross brace. It took me about 3 weeks to get all the cutting and assembly done. If I had owned a table saw, jig saw, miter saw, and a router I could have done the whole thing in about 2, maybe 3, days. It was an enormous hassle. Don’t do that.
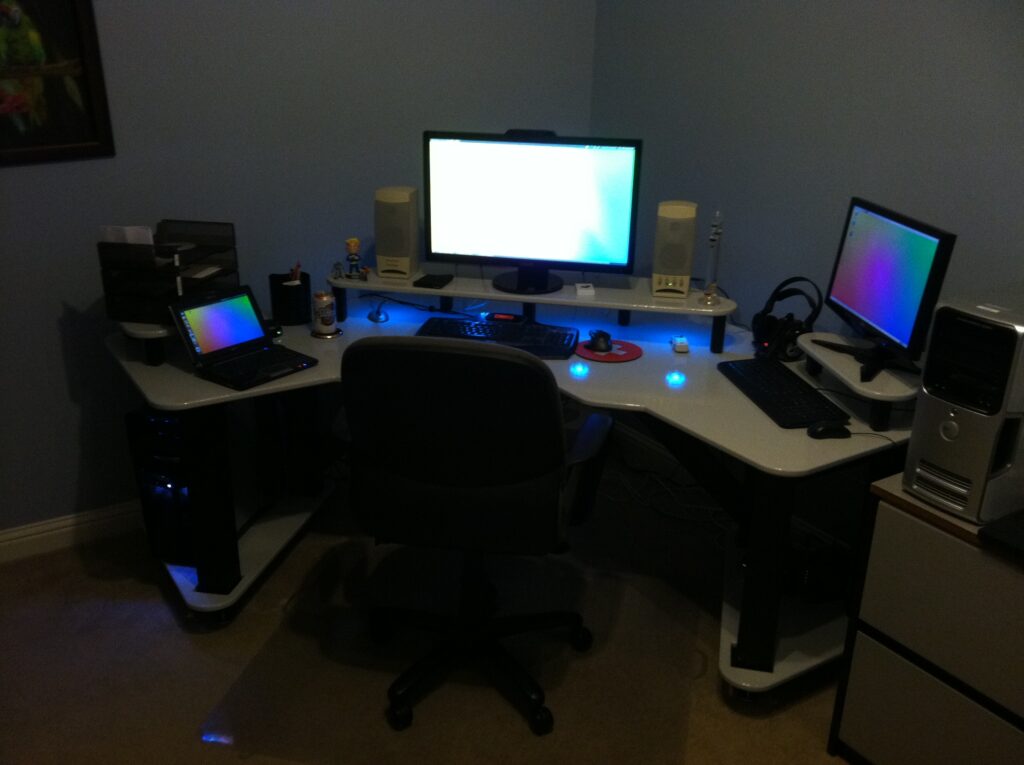
It would be really, really cool to get one of these LED light strip kits, and run the strip around the back of the desk. That’s a pro kit that will respond to music beats, and, for $100, it’s priced like it. There are some really cheap options in like this one at Amazon. Luckily, Ikea has several more affordable optionsin their “Dioder” line. I bit the bullet and bought one. That’s what’s providing the ambient light under the monitor stand. It’s worked out well for late-night gaming. Maybe I should hack it?… Or make it follow the colors in my monitor?…
That’s a Steelcase Rally chair, which I’ve written about before. I don’t know if it fits me perfectly, or that my back has deformed to fit it through years of abuse, but it works for me. It’s been my boon companion for years, even though I finally had to replace the gas cylinder in it.
Post-Mortem
Materials
I still think the ideal material to make the surfaces out of would be Corian. Additionally, it would be unbelievably awesome to cut it out flawlessly on a waterjet. Checking into it with Dupont’s cost-estimator, I see that 32 square feet of surface area would cost from $1,500 to $2,200, and that’s not taking into account of the fact that I’d want it in a non-kitchen-countertop width. They may not even make it in 4-foot widths. I’d be willing to make the depth shallower, but the cost would still be completely out of reach. In the same class, there’s also granite or marble. But, again, cost.
Woodworking
Make jigs for everything you can. Lay down rip fences out of clamped levels for making the long cuts on the MDF with a circular saw. Make a jig for the hole pattern on the shelves for cutting with a drill and jig saw. Make a stub of scrap to hold your length constant on the desk and stand legs when cutting with a miter saw so as to make them all exactly the same length.
Paint
After reading a lot about paint on the internet, I had decided on using oil-based paint for the surfaces. It was supposed to give the hardest and smoothest finish. Maybe it does and maybe it doesn’t. What I havelearned is that it takes hours between coats before it is tacky enough to lay down another, and weeks for it to fully cure. Until then, expect the rubber feet on things like keyboards and speakers to leave marks on the surface.
I bought an initial quart of gray paint, but used a lambskin roller to apply it. It was Sherwin-Williams’ “best” 4″ roller. It cost $8, which was more than twice as much as any other. It said it was good for oil-based paint. It wasn’t. It sucked. Badly. It left bits of material all through the paint, and left a heavy orange peel finish. It also coated so heavily that 2 coats completely used up my quart of paint on 32 square feet of surface area. There was nothing else to do but turn the pieces over and try again. I went back to the store, got another quart of paint, and both foam and mohair rollers. On my second try, the foam roller started leaving little bubbles in the paint, so I immediately chucked it and used the mohair ones. They didn’t hold much paint, but I learned to use them. I wound up making 3 coats, but I probably should have gone for 4 even-thinner ones. There are some inclusions, and there is some orange-peeling, but neither problem is nearly so bad as I got with the lambskin roller. This was serviceable enough that — once it finally, truly cured — I could sand it and coat it with polycrylic.
I ran across a kitchen countertop refurbishing kit while I was looking around at a home improvement store. It was $250, and I quickly abandoned any idea about using it. But I’ve just looked around on the internet, and there are other manufacturers of this sort of thing. There’s this one by a company named Giana, that looks really nice, is only $60, and would take care of the poly step as well.

Geometry
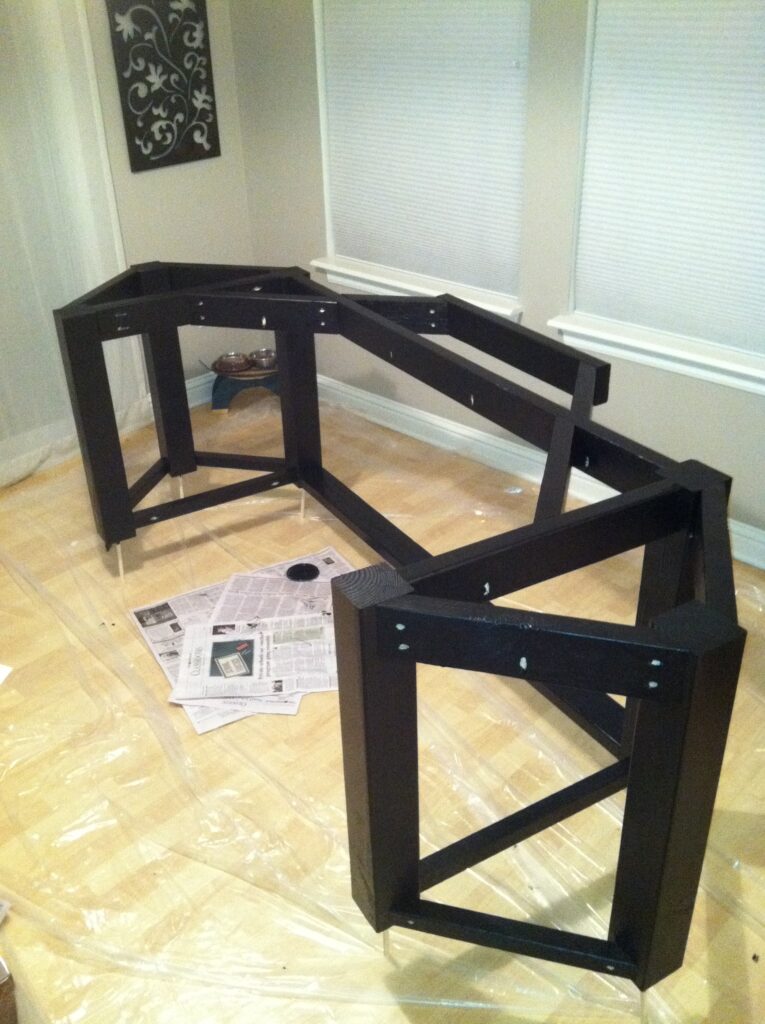
The desk’s center of gravity is further back than the SolidEdge model predicted. When moving the desk around, I can feel it wanting to tip over backwards. However, it reinforces my desire to redesign the support structure. The crossbar that runs directly under where the monitor sits should be moved further back. I still hit my knees on it sometimes, and one of the goals was never to do that. If you look at the frame painting picture, you can see what I’m talking about. The main board that connects both sides need to go away. Instead of running directly between the rear posts of the side structures, the supporting desktop frame should run to posts at the back of the desk, and get support from 45 degree boards like you see there. The big trick here is that I’d really want some vertical 45-degree angle supports between the back post of the side structures and the now-main frame boards running to the back of the desk, and this would require a fancy compound miter cut.
The top doesn’t mate really well with the frame. The screws I drove into the surface from the bottom to hold it in place on the frame got stripped in some places as I tried to cinch it down because I had some gaps. I’d lay out all of the boards on which the top lays, upside-down, on a flat floor, for assembly, and be careful that the pieces don’t move they’re screwed together, so as to make the “virtual surface” for the table top as level as possible.
Finally, I’d make the cutout in front of the keyboard another inch deeper, all the way around, so that I could scoot in just a hair closer.
Philosophizing
It really struck me, as I researched this idea, how seemingly arbitrary and random computer setups are, mine included. When you think about it, it’s a strange confluence of the room we happen to have, the decor, the gifts we’ve been given, our taste, and, of course, our budget. It winds up making a distinctive insight into our unique preferences and circumstances. It extrapolates from there into our lives in general, and the kind of people we are. We’re all just doing the best we can with what we have to follow our internal motivations and desires. I don’t know what to make of this realization. The bottom line is that I guess this will have to do until I can afford to build a LAN-party optimized house.
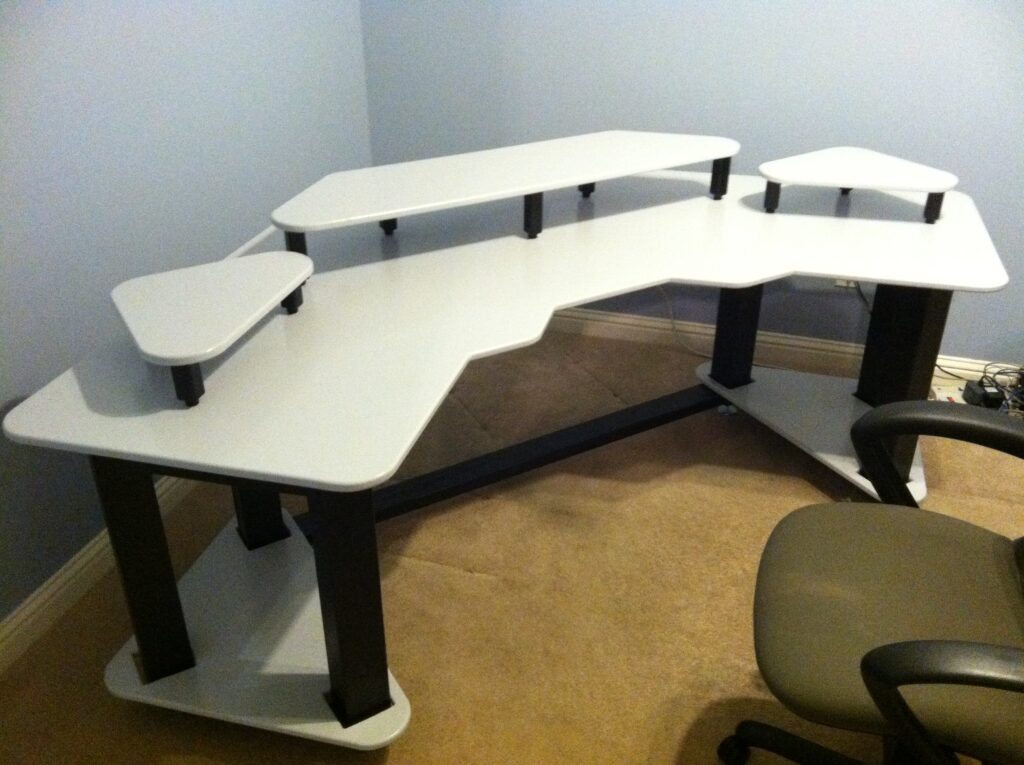
Today
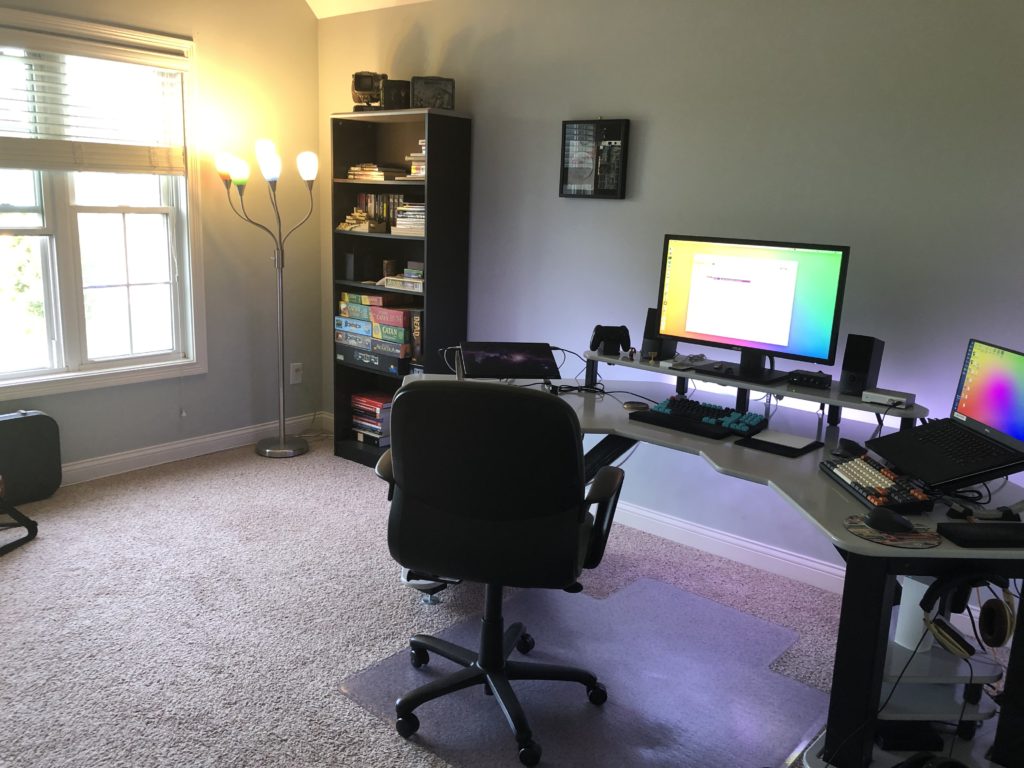
I built the desk in 2012. It’s 2019 as I copy the original writeup over to this new blog. As you can see, I eventually got a better lighting strip. The side tables were never really useful as monitor stands, but they’re great for shelves for the networking gear. Also, I finally got serious about cable management. I have two IKEA SIGNUM cable managers mounted under the table top. Each one can hold quite a bit of stuff by itself. The paint on the top is beginning to really show a lot of wear, where I rest my arms. I’m going to need to at least repaint, but I’ll probably use that as fuel for DESK 4.0!
Epilogue: Retirement
Unfortunately, there will be no Desk “4.0.” It’s a frightfully long story, but I’ve had surgery on my back for a spinal disc injury, and I need to stand more, so… This is my new life now. It’s an ApexDesk Elite Pro. It works pretty well. Since taking this picture, I got an Amazon-branded monitor arm mount, which neatly allows for repositioning the monitor between sitting and standing. I got the largest table top they offered, but I still miss how much space my old desk had. I “retired” it, by cutting it in half (so I could get it out the door), and letting the city pick it up off the curb.
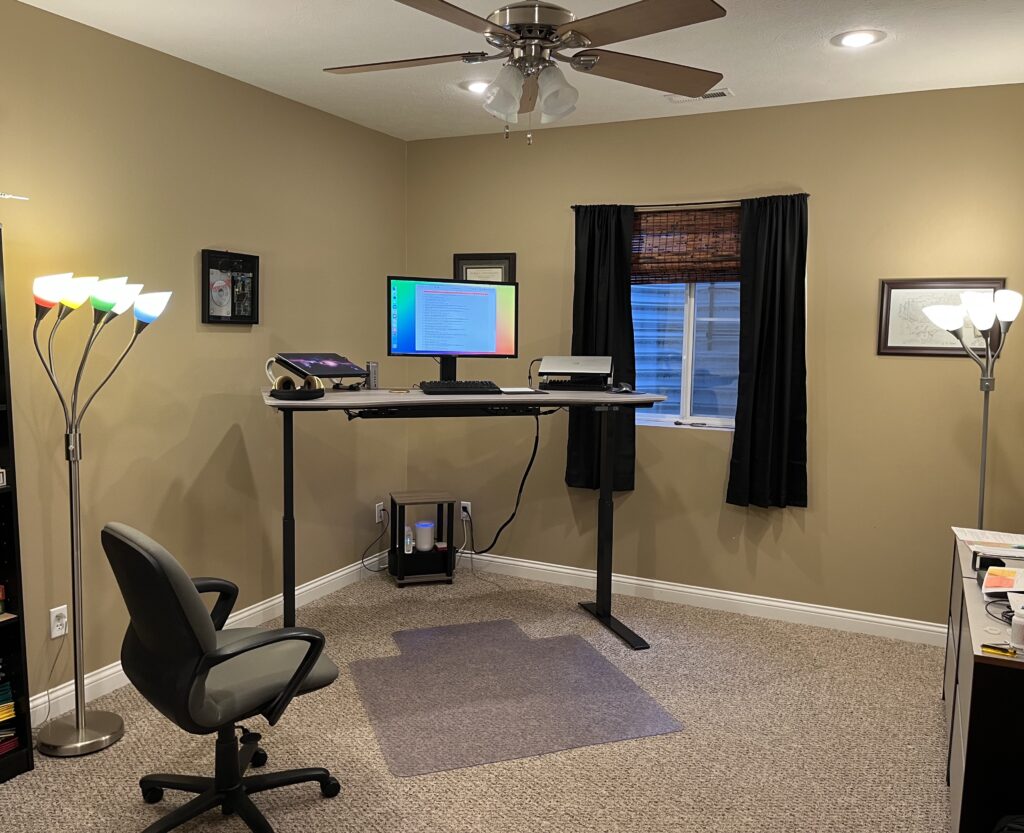
I’ve also upgraded my chair to a Herman Miller Aeron, just for the record. Finally. I should have done that years and years ago.